This tutorial was produced using Blender 2.49b.
Example of completed tutorial video:
The object of this tutorial is to show you how to use the compositor to fade between three identically placed planes with different textures on them. You will need to make sure you have some pictures (three, preferably) to use as backgrounds. I recommend creating a folder for this tutorial project and saving the images into it. Here are the three pictures I used:
 |
| From 3D Graphics |
 |
| From Photography |
 |
| From 3D Gallery |
Start blender and remove the default cube (X, Enter). Let’s save the project straight away so that everything is nicely organised. Save it into the same folder as your images. I named mine “Texture Fade Tutorial.blend”
Add a plane (Add->Mesh->Plane) and rotate 90 degrees around the X axis (R, 90, Enter). Now switch to front view so that you can see the plane from the front. It’s a good idea to set up the properties for the material on this plane that will be the same on the other planes now so that those properties are automatically applied to the duplicates.
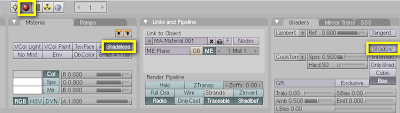
Go to the Shading buttons (F5) and add a new material. Turn off the Shadow button (under the shaders tab) and select the Shadeless button. We don’t want these planes to be affected by any lighting or shadows as they are supposed to be backdrops.
Just to help differentiate between the three planes we’ll be using, we’re going to give each one a different diffuse colour. For this first plane, change the colour to Red.
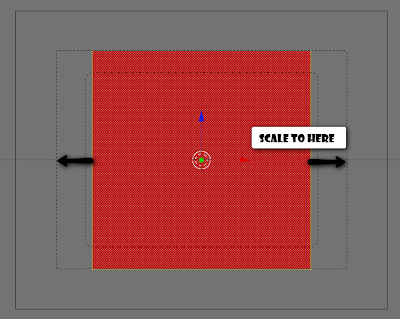
Make sure the plane is in the center of the view by pressing the decimal point (.) on the numpad and then press (Ctrl+Alt+Numpad 0) to align the camera to the view. Select the camera and move it closer to the plane until the plane just fills the outer dotted line (G, MMB, move mouse, Enter). Now select the plane and press (TAB) to go into edit mode. Select all of the vertices and scale them along the X axis to fill the rest of the outer dotted line (S, X, move mouse, Enter). (TAB) out of edit mode.
Our basic scene is now ready. Duplicate the plane and leave it in the same place (Shift+D, RMB). Move the new plane to layer 2 (M, 2, Enter). Select the plane again and duplicate it (Shift+D, RMB) and move this one to layer 3 (M, 3, Enter).
Press (2) to view layer 2 and select the plane. In the Shaders panel (F5), click on the number next to the name of the material to make this a single-user material.
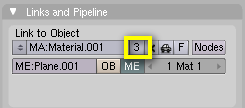
This means that this material now becomes unique to this plane instead of having it share the same material as the other planes. Change the diffuse colour to green.
Press (3) to view layer 3 and do the same for this plane but change the colour to yellow this time. We can now have all 3 layers on view and still be able to tell which plane we’re looking at, as they are all different colours. To turn all the layers on, Shift+click on layers 1 and 2 or hold (Shift) and press (1) then (2).

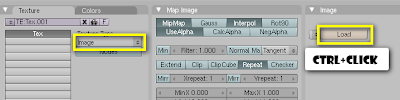
Select the red plane (right click the plane until it turns red) so that we can apply one of your images to its texture. Switch to the texture panel or press (F5) twice and click ‘Add New’. Select image for the texture type and then Ctrl+click on the ‘Load’ button which appears to go to the image browser. Browse to the folder you stored your images in and select the first image.
Now do the same for the green and yellow planes applying the second and third images respectively. Now the planes are ready, the scene is ready, we don’t need any lighting right now because all of the objects are shadeless. Now we must set up the render layers for the compositor.
Go to the scene buttons (F10) and select the Render Layers tab. Under Scene: you should see ‘1 Render Layer’. This layer will contain the red plane with your first image. To make it render just layer 1, click the first button underneath the name ‘1 Render Layer’.

Click the double arrows and choose ‘Add New’ to get ‘2 Render Layer’. Click the second button to assign layer 2 to this render layer. Add another new render layer and click the third button to assign layer 3 to this render layer.

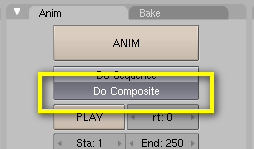
As we’ll be using the compositor, make sure ‘Do Composite’ is enabled under the Anim tab.
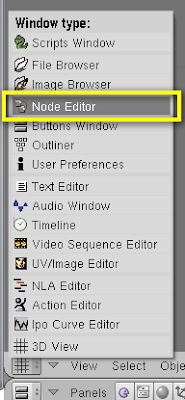
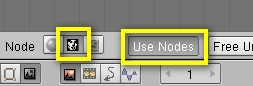
Change the 3D view to the Node Editor and click the little face icon to turn on the Compositor Nodes and then select ‘Use Nodes’. Select the Render Layer node and press (Shift+D) to duplicate it. Move it somewhere below the other node and then do the same again so that we have 3 Render Layer nodes. You might want to space everything out so that you can see it properly.
On the middle Render Layer node, click the drop down list which says ‘1 Render Layer’ and select ‘2 Render Layer’. On the bottom one, select ‘3 Render Layer’. Add a mix node (Add->Color->Mix). Duplicate it twice as you did with the Render Layer nodes. The first mix node will blend from 1 to 2, the second from 2 to 3 and the third from 3 back to 1 again allowing for a loop.
So, connect the first image’s image output noodle to the top image input noodle on the first mix node and the second image’s output noodle to the bottom image input noodle on the first mix node.
Now, connect the first mix node’s image output noodle to the top image input noodle on the second mix node and the third image’s output noodle to the bottom image input noodle on the second mix node.
Finally, connect the second mix node’s image output noodle to the top image input noodle on the last mix node and the first image’s output noodle to the bottom image input noodle on the last mix node.
It sounds very complicated but it looks quite logical. The last steps are to connect the last mix node to the composite node and add some time nodes to control when the fades occur. Connect the last mix node’s image output to the image input on the composite node.
Add three time input nodes (Add->Input->Time) and connect each one to the Factor input of each respective Mix node. Now, in each time node, enter the start and end frames for each fade. For example, the top one starting at 25 and ending at 50. The middle one starting at 150 and ending at 175. The last one starting at 225 and ending at 250. This brings the whole thing back to the first image for a smooth loop.
Here’s how it should look…
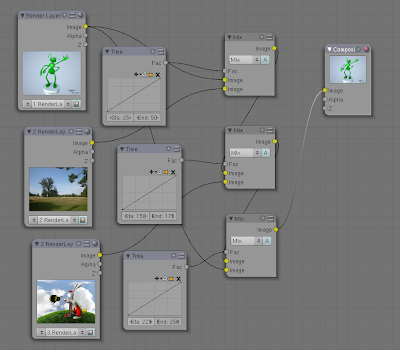
You don’t have to use these exact figures. You can make this animation whatever length you like and adjust the nodes accordingly.
Now it’s time to render the animation. Click on the Anim button in the scene buttons (F10) and when it’s finished rendering, click the Play button to watch it back.
nice blender tutorail check out http://www.cgwhat.com for some good maya tutorials